cppla带你玩k8s之二(kubernets-ha高可用集群)
目录
kubernetes-ha集群介绍
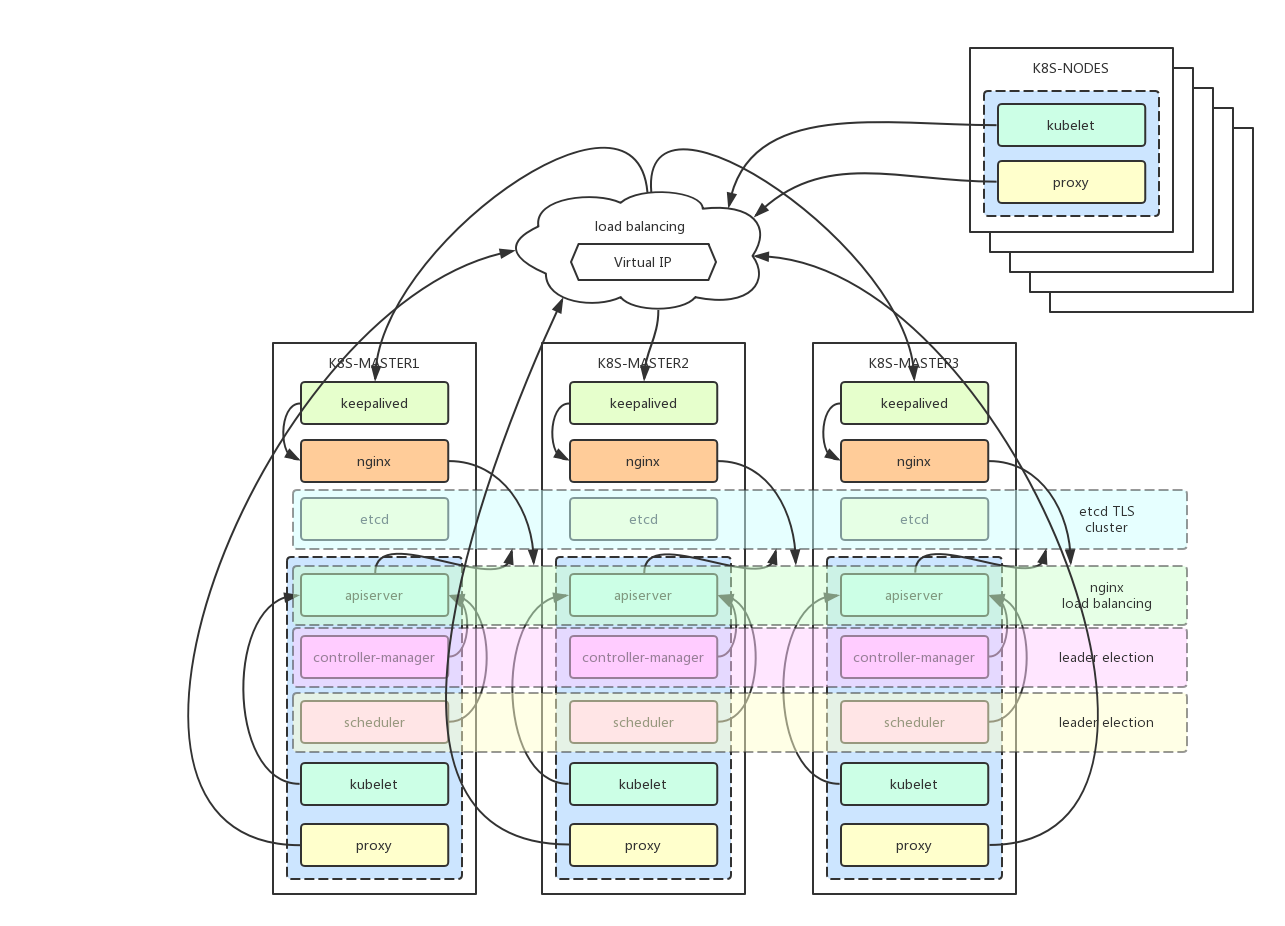
kubernetes master默认只有1个节点,当master宕机后是无法继续调度的。这里把kubernetes master节点扩展到3个节点,结合keepalived(ip飘移)技术完成高可用kubernetes集群组建,安装过程参考:https://github.com/cookeem/kubeadm-ha
VIP(virtual ip address)地址HA: 10.10.10.100 (使用keepalived实现)
|
1 2 3 4 5 6 7 8 |
# 三个k8s master节点,5个k8s work node。 # 系统均为centos7.6 4核4G,无SWAP,已关闭firewalld和Selinux vip 10.10.10.100 node1(master1) 10.10.10.11 node2(master2) 10.10.10.12 node3(master3) 10.10.10.13 node4 10.10.10.14 node5 10.10.10.15 |
kubernetes-ha集群架构图

kubernetes-ha集群准备过程
kubernetes集群安装准备不再重复,详细参考教程一:https://www.cpp.la/230.html
初始化inventory文件
|
1 2 |
declare -a IPS=(10.10.10.11 10.10.10.12 10.10.10.13 10.10.10.14 10.10.10.15) CONFIG_FILE=inventory/cppla/hosts.ini python3 contrib/inventory_builder/inventory.py ${IPS[@]} |
调整集群配置
|
1 2 3 4 5 6 7 8 9 10 11 12 13 14 15 16 17 18 19 20 21 22 23 24 25 26 27 28 29 |
[all] node1 ansible_host=10.10.10.11 ip=10.10.10.11 node2 ansible_host=10.10.10.12 ip=10.10.10.12 node3 ansible_host=10.10.10.13 ip=10.10.10.13 node4 ansible_host=10.10.10.14 ip=10.10.10.14 node5 ansible_host=10.10.10.15 ip=10.10.10.15 [kube-master] node1 node2 node3 [etcd] node1 node2 node3 [kube-node] node1 node2 node3 node4 node5 [k8s-cluster:children] kube-master kube-node [calico-rr] |
启动kubernetes集群
|
1 |
ansible-playbook -i inventory/cppla/hosts.ini cluster.yml |
验证kubernetes集群是否成功
|
1 2 3 4 5 6 7 8 |
# 查看kubernetes节点 kubectl get node # 查看pod分布 kubectl get node # 查看dashboard的集群内部IP kubectl get services --all-namespaces # 查看kubernetes集群信息 kubectl cluster-info |
|
1 2 3 4 5 6 7 8 |
#---------------------------------------- NAME STATUS ROLES AGE VERSION node1 Ready master,node 6m42s v1.13.2 node2 Ready master,node 5m58s v1.13.2 node3 Ready master,node 5m59s v1.13.2 node4 Ready node 5m22s v1.13.2 node5 Ready node 5m22s v1.13.2 #---------------------------------------- |
所有master节点安装keepalived 和 haproxy
|
1 |
apt/yum install -y keepalived haproxy |
所有master节点配置haproxy
|
1 2 3 4 5 6 7 8 9 10 11 12 13 14 15 16 17 18 19 20 21 22 23 24 25 26 27 28 29 30 31 32 33 34 35 36 37 |
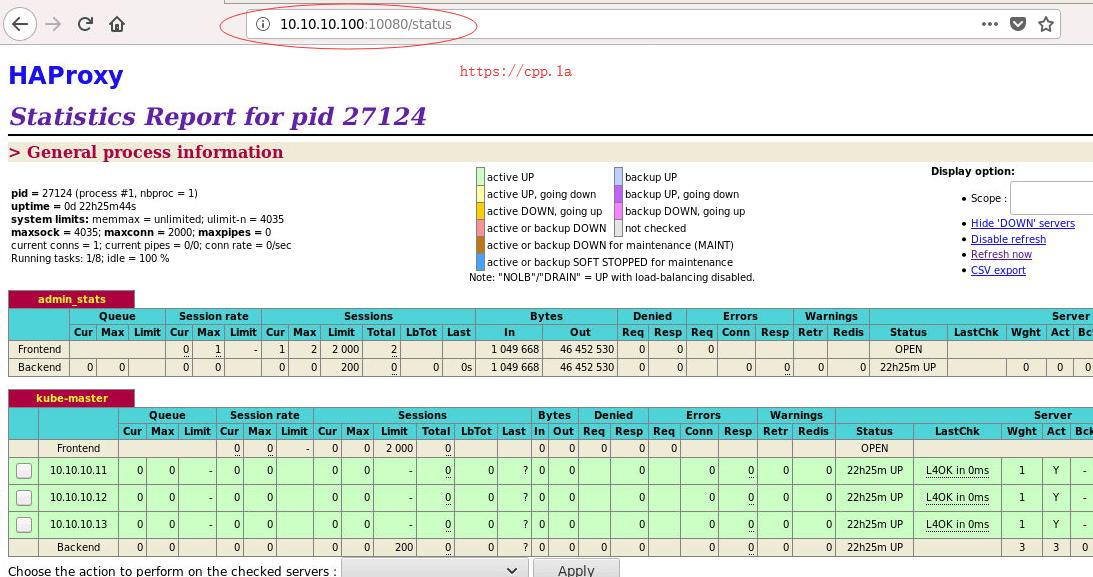
# cat /etc/haproxy/haproxy.cfg global log /dev/log local0 log /dev/log local1 notice chroot /var/lib/haproxy stats socket /var/run/haproxy-admin.sock mode 660 level admin stats timeout 30s user haproxy group haproxy daemon nbproc 1 defaults log global timeout connect 5000 timeout client 10m timeout server 10m listen admin_stats bind 0.0.0.0:10080 mode http log 127.0.0.1 local0 err stats refresh 30s stats uri /status stats realm welcome login\ Haproxy stats auth admin:123456 stats hide-version stats admin if TRUE listen kube-master bind 0.0.0.0:8443 mode tcp option tcplog balance source server 10.10.10.11 10.10.10.11:6443 check inter 2000 fall 2 rise 2 weight 1 server 10.10.10.12 10.10.10.12:6443 check inter 2000 fall 2 rise 2 weight 1 server 10.10.10.13 10.10.10.13:6443 check inter 2000 fall 2 rise 2 weight 1 |
keepalived模式是一主二备
node1 master keepalived配置
- VIP 所在的接口(interface ${VIP_IF})为 eth0;
- 使用 killall -0 haproxy 命令检查所在节点的 haproxy 进程是否正常。如果异常则将权重减少(-30),从而触发重新选主过程;
- router_id、virtual_router_id 用于标识属于该 HA 的 keepalived 实例,如果有多套 keepalived HA,则必须各不相同;
|
1 2 3 4 5 6 7 8 9 10 11 12 13 14 15 16 17 18 19 20 21 22 23 24 25 26 27 28 29 30 31 |
# cat /etc/keepalived/keepalived.conf ### keepalived-master.conf global_defs { router_id lb-master-105 } vrrp_script check-haproxy { script "killall -0 haproxy" interval 5 weight -30 } vrrp_instance VI-kube-master { unicast_src_ip 10.10.10.11 unicast_peer { 10.10.10.12 10.10.10.13 } state MASTER priority 120 dont_track_primary interface eth0 virtual_router_id 68 advert_int 3 track_script { check-haproxy } virtual_ipaddress { 10.10.10.100/24 } } |
node2 and node3 backup keepalived配置
- VIP 所在的接口(interface ${VIP_IF})为 eth0;
- 使用 killall -0 haproxy 命令检查所在节点的 haproxy 进程是否正常。如果异常则将权重减少(-30),从而触发重新选主过程;
- router_id、virtual_router_id 用于标识属于该 HA 的 keepalived 实例,如果有多套 keepalived HA,则必须各不相同;
- priority 的值必须小于 master 的值;
- node2节点priority设置为110,node2节点priority设置为100,同时注意配置:unicast_src_ip 和 unicast_peer。
|
1 2 3 4 5 6 7 8 9 10 11 12 13 14 15 16 17 18 19 20 21 22 23 24 25 26 27 28 29 30 31 |
# cat /etc/keepalived/keepalived.conf ### keepalived-backup.conf global_defs { router_id lb-backup-105 } vrrp_script check-haproxy { script "killall -0 haproxy" interval 5 weight -30 } vrrp_instance VI-kube-master { unicast_src_ip 10.10.10.12 unicast_peer { 10.10.10.11 10.10.10.13 } state BACKUP priority 110 dont_track_primary interface eth0 virtual_router_id 68 advert_int 3 track_script { check-haproxy } virtual_ipaddress { 10.10.10.100/24 } } |
kubernetes-ha-cluster遇到的坑
AWS,DigitalOcean等公有云主机默认禁止了组播,所以Keepalived这里推荐采用单播的心跳方式
另外由于公有云都为虚拟机,限制比较严重,已知有网关或其他arp得原因。
- 建议在局域网或自有IDC测试该集群。
- 生产环境联系机房,通过网络设置使得Virtual ip这个VIP可以通过内网访问。
|
1 2 3 |
# keepalived解释 unicast_src_ip 表示发送VRRP单播报文使用的源IP地址 unicast_peer 表示对端接收VRRP单播报文的IP地址 |
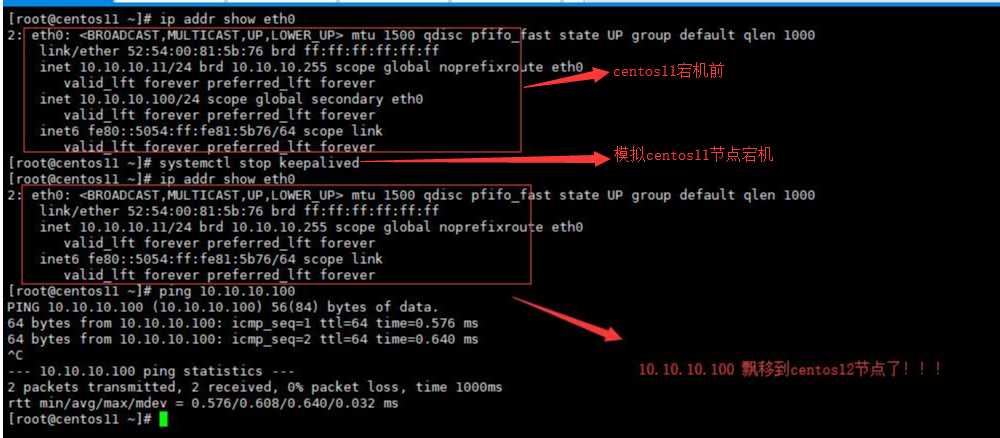
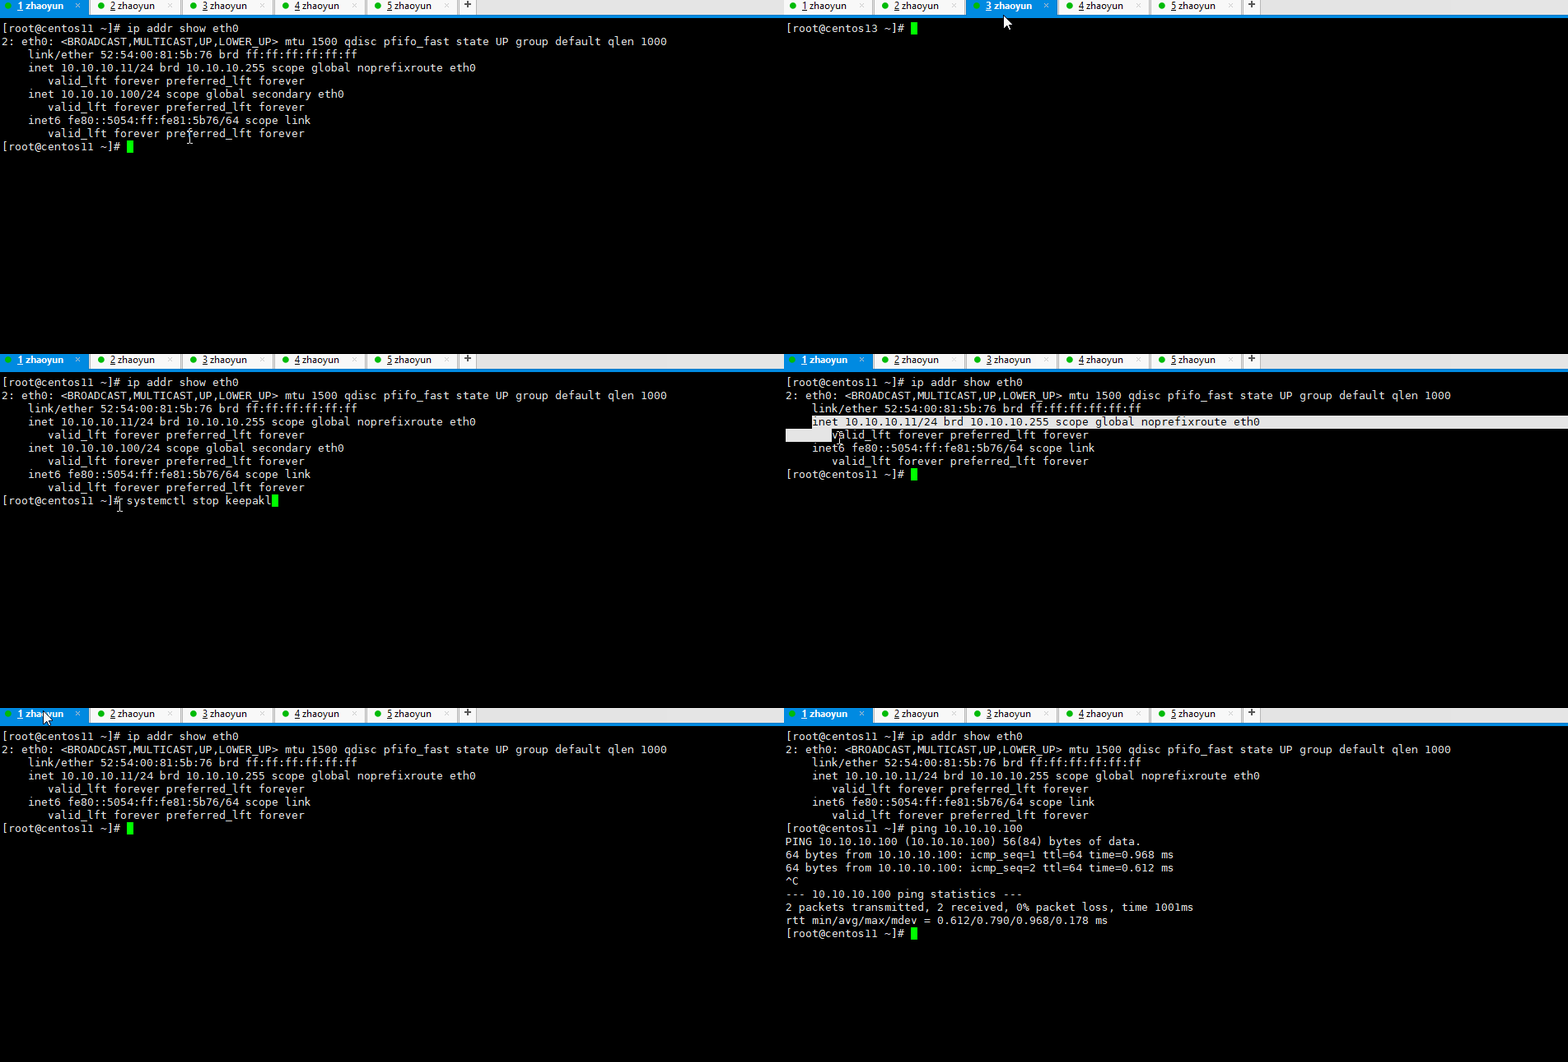
IP飘移演示
首先在所有master节点启动服务systemctl start haproxy; systemctl start keepalived;

gif动图演示如下 cpp.la:

kubernetes-VIP高可用演示

其他参考配置
|
1 2 3 4 5 6 7 |
# for killall command: apt/yum -y install psmisc # 确认是否开启转发 net.ipv4.ip_forward = 1 # 开启允许绑定非本机的IP【这里没用到】 net.ipv4.ip_nonlocal_bind = 1 |
以上测试on centos7.6, time:20190125, by: cpp.la
